Can Someone Have A Baby Already?

img_20161227_032949499

Making miniature clothes is so much fun! It would take a lot for me to reach for a peter pan collar for myself but when you’re dressing a baby the cuter the better!

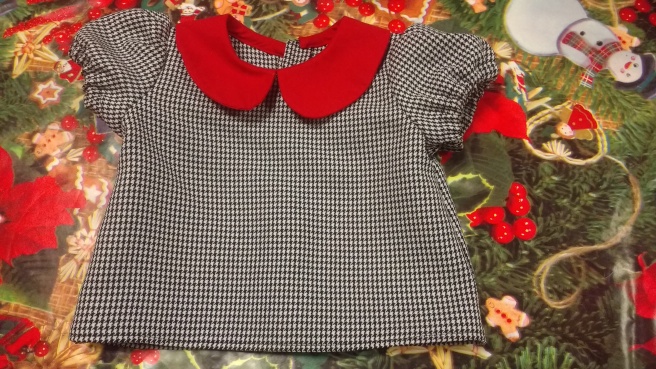
This is the Peter Pan Collar Shirt from Shaka Laka Bum Patterns on Etsy. Yes that is the actual name and I love it. You have to have a pretty decent sense of humour to name your business that so I take a (little tiny) hat off to you Filipa. It’s a PDF only pattern and comes in  sizes ranging from 0-3 months to 2-3 years.

I actually really appreciate PDF patterns. You can download them immediately and print them on sturdy paper rather than the annoying tissue paper that comes with most patterns. I like to cut round the size I need rather than trace it off, and with a PDF pattern if you find you need a different size you just print it again.

This pattern is so easy to put together, and very clearly laid out and annotated, and with it being for babies, there are only 8 pages to stick together. It’s great if you have any leftover fabric to use.

img_20161227_032927580

I made it up in the 0-3 months category, thinking I would give it to my cousin who had only just had a baby girl, however I started this at the end of the summer just before I went back to London and of course, didn’t give myself enough time to finish it. I always see on Instagram and other blogs people being like ‘Oh I whipped this up in an hour’. Tell me your secrets people!! I am the slowest person. In a way I like that because it’s kind of at odds with the rest of my life so it gives me a chance to relax, but at the same time, I just don’t get as much done as I’d like.

img_20161227_033035872

Oh well, it’s finished now but the little baby is too big to wear it. It will just have to wait patiently in a drawer for the next baby to be born. You can see in the photos that some of the blue chalk I used to mark the buttonholes is still on the fabric. I’m going to be honest here, I think I forgot to prewash this fabric and now I’m really scared that if I do wash it, it will shrink. Maybe if I just handwash it in the sink it will be ok? Maybe? Or maybe I should do a raindance to please the fabric gods. Or maybe they’d like a glitter dance better? I think I’d like a glitter dance better.

The fabric I used is some sort of polyester from somewhere on Goldhawk Road and was a nightmare to press. The buttonbands especially took me ages. I don’t have a clapper so I used my Great Granny’s wooden knitting needle box instead. Crude? Yes. Sacrilege? Maybe. But it did the trick.

img_20161227_032940732

The fabric has an awful tendency to unravel too and with it left cut for so long, this proved a little bit of a difficulty when sewing up the 3mm seam for attaching the collar especially. Both a cm and inch version of the pattern instructions are provided and I don’t really have any qualms with the idea of such small seam allowances in theory. Filipa says in her profile that she studied design and I believe that 1cm seam allowances are pretty standard in the fashion world, however, it really did cause me some grief with my unraveling fabric, and my sewing machine just did not want to go along with it either.

I use a Pfaff Smarter 140s. I really like it and it has been very good to me as a beginner especially, but it just does not like small seam allowances. Every time I try to stick to that 1/4in guideline, the fabric wants to go to the left, making the actual seam allowance I’m using even smaller. When I tried to adhere to the 3mm seam allowance it came out at more like 1.5mm seam allowance. Not a huge deal in a baby garment but it is annoying. My theory is that with such small measurements, the edge of the fabric is running directly above the feed dogs and when they move, the fabric moves to the left with it.

img_20161227_033020970

Overall though I really like how it turned out. I think it’s super cute but quite modern at the same time. I love the button up back. I just used simple 1cm black shank buttons I found in my local craft store (McMullans in Dungannon if you’re interested – they have a small section upstairs), and I think they work really well against the fabric. What I did find quite interesting with this fabric though is how the black stripes of the houndstooth fabric affected the black thread in the buttonholes. When the edges of the buttonhole fell over the black stripes, the buttonholes looked lovely, but when they fell over the white stripes, it made the buttonhole look really quite hideous and badly made. I did try to do the third one again to see if I could make it look any better but it was no use. I did my best to pattern match but when it came to it, the vertical lines on the fabric are ever so slightly wonky, not enough to bother me usually, but the way it affects the buttonholes is quite irritating.

img_20161227_032956530

For now though, I’m going to keep staring at it all day whilst I tell my ovaries to calm down. I won’t be having a baby just so I can dress it up in this. Seriously ovaries, I’m telling you no.


The Jeans Issue

DSC06353.JPG

How inspiring has Portia at the Makery’s Refashioners Challenge been this year? If you don’t know what it is all the details are here. Basically, it’s a challenge to turn old pairs of jeans into something new and I have surprised myself at all the ideas I’ve been having. If you’re stuck for ideas check out the blogger line up on the Makery. So many different makes yet all. so. good. For this refashion, I’ve used two pairs of jeans from a charity shop.

This challenge has actually come at a good time because patchwork denim is really in at the moment. Apparently there’s a thing called the Vetements Trend where the brand have been sourcing vintage jeans, and patching them together, which I actually REALLY want to try to replicate.

I wanted to go for an intentially messy look. Something clean-lined but with a wild and free edge to it. Also I just really wanted to give a nod towards the 90s. I was born during the middle of that decade and I loved my dungarees SO much when I was a kid. AND we had the Bananas in Pyjamas golden era! What a time to be a child.

DSC06350.JPG

After gathering up all my Pinterest inspiration I knew exactly what I had in mind so I decided to give drafting a top a go. For my first attempt at bodice drafting I don’t think it turned out too badly in the end. I did two toiles and boy did those armholes give me so much bother! I just couldn’t get them right. There was so much gaping above the bust at the armhole and I tried to tuck it out but really I had no idea what I was actually doing here. I fixed it a little and with the fraying at the armholes it isn’t very noticable but if anybody could point me in the direction of a Craftsy course or a good book on this I would really appreciate it!

Refashioners 2016 Denim Top

The whole garment wants to ride to the back over my shoulders. I think I would probably have needed to add length at the back shoulder seam, to fix this because when I pull it to the right position, the back armhole (armscye?) seems a bit tight.

Overall though I’m really happy with how it turned out. I really like the free back. It’s not very bra-friendly and I don’t happen to have a backless one so I’ve just been wearing this bra-free. Let me be the first to tell you I have never worn anything bra-free since my boobs arrived. They aren’t very big (at all) so support isn’t really the issue but usually I like that little bit of extra padding a bra gives. And I’d be terrified of my nips showing through. As much as I want to be a feminist and embrace bralessness, I still have my own insecurities. But with the thickness of the jeans denim I don’t have to worry about any of this. Wahey! Also, I did a stretch test with my arms in a number of positions. No peeking either!

The Refashioners 2016 Denim Top

And the structure of the top kind of skims past nicely. I think with the high neckline going on too, it doesn’t really draw your attention to it.

Refashioners 2016 Denim Top

But em, don’t mind my very bare, very pale back though! Sorry if it’s vampire state blinds you.

I just roughly cut waistband pieces off one of the pairs of jeans and topstiched it on, leaving the edges so that they can distress over time. I actually can get this top on and off over my head which is a blessing as I don’t have a maid to help me do up that button in the morning.

The Refashioners 2016 Denim Top

I stitched 5/8 in around all edges of the garment and then frayed the denim back to the stitching line. This takes an insanely long time so if you’re going to do this, don’t enter into it lightly.

The Refashioners 2016 Denim Top

On the patches I wanted to continue the frayed look so they didn’t seem out of place. On each patch I seamed one edge properly and then I topstitched the other edge without seaming it, leaving it to fray itself.

The Refashioners 2016 Denim Top

On the inside I, again, didn’t wanted a very finished look so I didn’t trim any seam allowances. I just stitched a line either side of the seam line, so that the seam allowances can fray over time, without getting anywhere near the important stitches.

The Refashioners 2016 Denim Top

I am so happy with this top! I’m glad it didn’t end up looking too patchworky and I can actually get away with wearing it with jeans without looking like Britney and Justin 2.0.

The Refashioners 2016 Denim Top

You have until the end of September to have a go yourself and I seriously encourage you to. This was my first refashion and it makes you think in a completely different way to approaching a ‘normal’ pattern with x yards of fabric. Especially with the jeans, I couldn’t have cut full pieces out of one pair so you have to think around it. I have more ideas on this but who knows whether I’ll actually get around to them in time!

Follow my blog with Bloglovin


A Skirt Out of Season

Well, my plan of moving my sewing machine to London with me didn’t happen to say the least! It’s been one hell of a year and I’m glad to be home for a few weeks before the madness all starts again.

DSC06250.JPG

This is a self-drafted skirt I began in April but have only just got finished. While it’s only a simple skirt it was my first time making something that wasn’t from a pattern and like the first time I took my measurements, I was more than a little bit generous and had to take it in a good couple of times.

I made it from a 40cm length of wool fabric I got on the clearance rail in Craftswoman Fabrics in Carrickfergus hence the very short hem but I do actually like it that way. I think if I was going to make it again I might move the waistband up slightly. Especially as the fabric’s so thick at the waistband, I’m not sure quite how flattering it looks. It’s a little like a cube on me but a little cube I still quite like.

DSC06252.JPG

I did learn a few new techniques in this one. I successfully inserted an invisible zip on my 3rd attempt. Unpicking that was not fun. My problems with the first two goes were because I hadn’t uncurled the teeth enough to get close to them. I also blind stitched the hem on my machine. There are a couple of gaps where I didn’t quite catch the fabric on the right side but the hem’s not going to fall down anytime soon so I just left it.

DSC06253.JPG

It’s fully lined with a plain black lining fabric and the waistband is just interfaced, folded over and slip stitched by hand so that it didn’t look like a waistband. You can see in the photos that the fabric layers there are so thick that you can see the line where it stops anyway.

I’m really glad to be back home with my family and friends for a short time. It’s really tough moving away for the first time. Everything’s a new experience and I even had to Google search how to sort out colours, darks and whites, and whether or not I could tumble dry jeans. Well I can now say that I’ve made it through a year of independent living with only dying my bedsheet blue in the wash, and successfully removing many ice cream and chopped tomato stains. I don’t know what my Mum would have to say on that front but I’m calling it a success.